SQL in a nutshell | Learn SQL
SQL stands for Structured Query Language. SQL is used to access and modify the data in a database.
All dynamic web applications and websites make use of a database and only way to access these database is through SQL.
Now practically what happens is that a programming language passes an SQL command which returns the result which is further processed for viewing.
Let's cut the theory and move to practical.
Objective: We will be making a small PHP website(chat room) using the SQL commands to feed and fetch the details. I will leave the lessons of PHP for some other day, in fact I'm myself in the learning phase as well.
I recommend using an online service for practicing. 000webhost is free and provides you everything.
For this tutorial I will be using 000webhost so that the project I end up with will be public for demo.
Setting up a Database and SQL always involves
These are some basic SQL commands that will come in handy, always.
Creating a database: SQL>create database myDB
You don't need this command when using Oracle. We simply create tables in Oracle and use them.
Creating a table: SQL>create table myTable(column1 number(8), column2 varchar2(20));
The above command results in a table of name myTable with two columns. First column will accept values only of type number that too of size upto 8 and column2 will accept value of type varchar which can take any number or character or combination of both.
In case you need to modify the table you just made, following command will be helpful
alter table tableName add columnName datatype;
alter table tableName drop column columnName;
alter table tableName modify columnName datatype;
alter table tableName rename column oldName to newName;
rename yourtable to mytable;
Inserting data into the table.
insert into tableName values(87, 'hello');
In case you want to change a value you have previously entered.
update mytable set uname='abhay' where uid=123;
Use where clause to narrow your search to specific data.
Like wise there are just too many commands and that would just complicate things for a beginner.
Let's get our hands dirty by making an actual application that uses database and SQL.
Objective here is to make a small website that will let anyone post a message to it and it would be visible to everyone.
To explain it like you're 5 year old.
I will make a table which will have a serial number like 1,2,3 and so on and a data associated with each number.
Firstly I will make a database and grant privileges to a user to modify this database. Luckily 000webhost provides a very simple way to do this.

To make this type of table I will run the command
SQL>CREATE TABLE `posts` ( `serial` INT NOT NULL , `content` LONGTEXT NOT NULL );
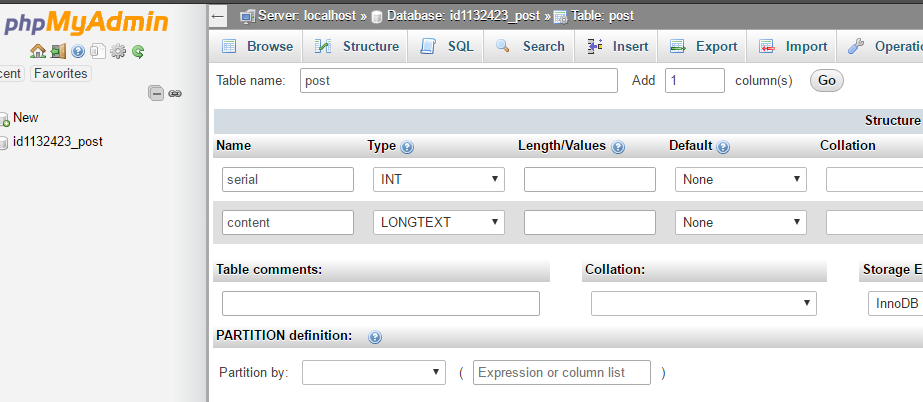
But unfortunately it wasn't as easy as it may look. I used phpMyAdmin to generate my SQL command which was
CREATE TABLE `id1132423_post`.`post` ( `serial` INT NOT NULL , `content` LONGTEXT NOT NULL ) ENGINE = InnoDB;
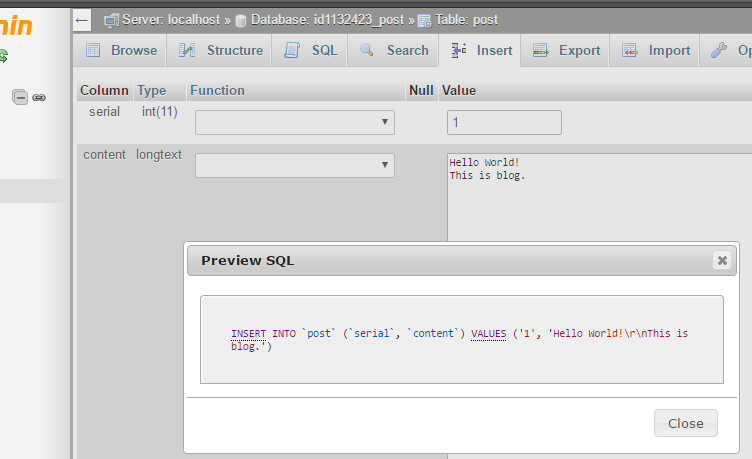
Now we will test the working of our database by inserting some dummy content.
For this I will use the Insert tab in phpMyAdmin and preview the SQL command and note it.
Now the SQL was generated as
SQL>INSERT INTO `post` (`serial`, `content`) VALUES ('1', 'Hello World!\r\nThis is blog.');
Now I will be executing the likes of above SQL command through my PHP page.
Now let's make a PHP file and make a connection to the database.
For this I will need following details,
then make a file by the name index.php
and put following code in it
<html>
<head>
<title>Post it!</title>
</head>
<body style="background-color:#efefef; font-family:monospace;">
<h1 style="text-align:center;">Post it!</h1>
<?php
$db = mysqli_connect('localhost','databaseUser','password','databaseName')
or die('Error connecting to MySQL server.');
$query = 'SELECT * FROM post ORDER BY timestamp DESC LIMIT 20';
mysqli_query($db, $query) or die('Error querying database.');
?>
<form action="post.php" method="post" align="center">
<input type="text" name="id" placeholder="enter a number(optional)" />
<input type="text" name="content" placeholder="enter a text"/>
<input type="submit" value="submit" onclick="test()" />
</form>
<?php
$result = mysqli_query($db, $query);
while($row = mysqli_fetch_array($result))
{
echo "<table align="."center".">";
echo "<tr>";
echo "<td>$row[0]</td>";
echo "<td>$row[1]</td><br/>";
echo "</tr>\n";
echo "</table>";
}
mysqli_close($db);
?>
</body>
</html>
This file makes a call to post.php
Make another file and save it with following content as post.php
<?php
$sContent = $_POST['content'];
$db = mysqli_connect('localhost','databaseUser','password','databaseName')
or die('Error connecting to MySQL server.');
$query = "INSERT INTO `post` (`id`, `content`, `timestamp`) VALUES (NULL, '".$sContent."', CURRENT_TIMESTAMP)";
mysqli_query($db, $query) or die('Error querying database.');
mysqli_close($db);
header('Location: ' . $_SERVER['HTTP_REFERER']);
?>
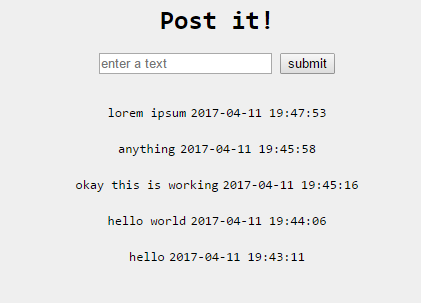
I made post.s2pd.com with just these code.
It is kind of chat room. I will be covering the break down of PHP code in another post.
Go experiment.
Update: I have made this project available on Github here.
All dynamic web applications and websites make use of a database and only way to access these database is through SQL.
Now practically what happens is that a programming language passes an SQL command which returns the result which is further processed for viewing.
 |
| Demo of what we are making here Post it! Chatroom |
Let's cut the theory and move to practical.
Objective: We will be making a small PHP website(chat room) using the SQL commands to feed and fetch the details. I will leave the lessons of PHP for some other day, in fact I'm myself in the learning phase as well.
Part 1. Database and SQL installation.
If you wish to run a database on your local machine follow this link.I recommend using an online service for practicing. 000webhost is free and provides you everything.
For this tutorial I will be using 000webhost so that the project I end up with will be public for demo.
Setting up a Database and SQL always involves
- Creating a database.
- Defining a user and granting him privileges to modify the database we created in step 1.
Part 2: Basic SQL commands.
These are some basic SQL commands that will come in handy, always.
Creating a database: SQL>create database myDB
You don't need this command when using Oracle. We simply create tables in Oracle and use them.
Creating a table: SQL>create table myTable(column1 number(8), column2 varchar2(20));
The above command results in a table of name myTable with two columns. First column will accept values only of type number that too of size upto 8 and column2 will accept value of type varchar which can take any number or character or combination of both.
In case you need to modify the table you just made, following command will be helpful
alter table tableName add columnName datatype;
alter table tableName drop column columnName;
alter table tableName modify columnName datatype;
alter table tableName rename column oldName to newName;
rename yourtable to mytable;
Inserting data into the table.
insert into tableName values(87, 'hello');
In case you want to change a value you have previously entered.
update mytable set uname='abhay' where uid=123;
Use where clause to narrow your search to specific data.
Like wise there are just too many commands and that would just complicate things for a beginner.
Part 3: PHP website using SQL
Let's get our hands dirty by making an actual application that uses database and SQL.
Objective here is to make a small website that will let anyone post a message to it and it would be visible to everyone.
To explain it like you're 5 year old.
I will make a table which will have a serial number like 1,2,3 and so on and a data associated with each number.
- I just made this up.
- Some text here.
- Well yea again.
Firstly I will make a database and grant privileges to a user to modify this database. Luckily 000webhost provides a very simple way to do this.
To make this type of table I will run the command
SQL>CREATE TABLE `posts` ( `serial` INT NOT NULL , `content` LONGTEXT NOT NULL );
But unfortunately it wasn't as easy as it may look. I used phpMyAdmin to generate my SQL command which was
CREATE TABLE `id1132423_post`.`post` ( `serial` INT NOT NULL , `content` LONGTEXT NOT NULL ) ENGINE = InnoDB;
Now we will test the working of our database by inserting some dummy content.
For this I will use the Insert tab in phpMyAdmin and preview the SQL command and note it.
Now the SQL was generated as
SQL>INSERT INTO `post` (`serial`, `content`) VALUES ('1', 'Hello World!\r\nThis is blog.');
Now I will be executing the likes of above SQL command through my PHP page.
Now let's make a PHP file and make a connection to the database.
For this I will need following details,
- database host name, usually localhost. .
- database name, whatever you chose earlier, in case of 000webhost it can be found in settings.
- database user,
- database password for that user.
then make a file by the name index.php
and put following code in it
<html>
<head>
<title>Post it!</title>
</head>
<body style="background-color:#efefef; font-family:monospace;">
<h1 style="text-align:center;">Post it!</h1>
<?php
$db = mysqli_connect('localhost','databaseUser','password','databaseName')
or die('Error connecting to MySQL server.');
$query = 'SELECT * FROM post ORDER BY timestamp DESC LIMIT 20';
mysqli_query($db, $query) or die('Error querying database.');
?>
<form action="post.php" method="post" align="center">
<input type="text" name="id" placeholder="enter a number(optional)" />
<input type="text" name="content" placeholder="enter a text"/>
<input type="submit" value="submit" onclick="test()" />
</form>
<?php
$result = mysqli_query($db, $query);
while($row = mysqli_fetch_array($result))
{
echo "<table align="."center".">";
echo "<tr>";
echo "<td>$row[0]</td>";
echo "<td>$row[1]</td><br/>";
echo "</tr>\n";
echo "</table>";
}
mysqli_close($db);
?>
</body>
</html>
This file makes a call to post.php
Make another file and save it with following content as post.php
<?php
$sContent = $_POST['content'];
$db = mysqli_connect('localhost','databaseUser','password','databaseName')
or die('Error connecting to MySQL server.');
$query = "INSERT INTO `post` (`id`, `content`, `timestamp`) VALUES (NULL, '".$sContent."', CURRENT_TIMESTAMP)";
mysqli_query($db, $query) or die('Error querying database.');
mysqli_close($db);
header('Location: ' . $_SERVER['HTTP_REFERER']);
?>
I made post.s2pd.com with just these code.
It is kind of chat room. I will be covering the break down of PHP code in another post.
Go experiment.
Update: I have made this project available on Github here.